Visual identity

If you want promote your business, then you have come to the right place. more »

Unique solutions

If you want promote your business, then you have come to the right place. more »

Live support

If you want promote your business, then you have come to the right place. more »
Showing posts with label Free. Show all posts

Facebook Chat Instant Messenger - FB Messenger

Posted by Unknown

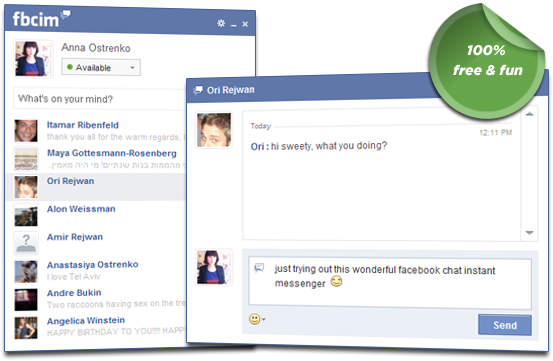
 Facebook Chat Instant Messenger

Chat with your Facebook friends right from your desktop.

Facebook Chat Instant Messenger - FB Messenger

Chat outside of Facebook

Stay connected whether you’re surfing the Web, watching a video or even playing a game, FBCIM allows you to use Facebook Chat without the need to be logged on to Facebook.

Chat at home, work or at school

 No matter where you are FBCIM allows you to chat with all your friends even behind a firewall.

Instant notification

Find out about new messages, comments or status updates instantly and never miss a friend again.

Free and Open Source

FBCIM is released under the GNU LGPL this means that not only that it’s completely free and shall always remain free but also that its source code must always be available for download and can be used on other open source projects. To join our development team please visit our project page on SourceForge. 
Facebook Chat Instant Messenger - FB Messenger


 Downloading Link For Facebook Chat Instant Messenger

Click Here To Download Facebook Messenger

100% Free for all Windows operating systems

Facebook Chat Instant Messenger - FB Messenger
more »

How to Insert Adsense Ads Below Post Title - Blogger

Posted by Unknown
How to Insert Adsense Ads Below Post Title - Blogger
Adsense works great on content receiving good traffic from search engines, because it is a targeted keyword based PPC ad network. but if you receive good traffic from search engines and still don't make considerable income with it then you might be doing  some mistakes somewhere in implementation, and ads placements is included in this. So make sure your ads are on the right placements where visitors pay attention at first. We can implement Google ads on any platform or manually created websites, we can insert the ads wherever we want into our pages. But the problem is with blogger blogs, when you use blogger.com for your blog then you are limited to add third party widgets only by using HTML/JavaScript widget in the Layout area. You don't have direct access to the blog post body or Single post in WordPress. Therefore, it becomes headache when you want to insert Adsense ads inside your blog posts, and this is very necessary because the best positions for Google ads are; the header, the post body, below the posts and the sidebar. You can use the header in some templates and sidebar in every template, but the main placement is below the post titles in blogger.


But as you might know that blogger.com is built within XML which doesn't allow some characters inside scripts such as >, +, <, && and so on. Therefore, we'll need to alter the ad codes to make it possible.

So this post is all about inserting Google ads below post titles in Blogger for increasing your CTR (Click rate on ads), and the revenue. obviously, when CTR get boosted, the revenue get increased.

I won't take your much time, and I've simplified the tutorial, you just need to follow the tips and easily insert Google Ads below post titles in blogger. And you'll see a dramatic change in your earning and CTR. Let's start how to do this.

    Login into your Adsense account: Adsense Home Page.
    Go to my Ads at top left side and click My Ads >> Create a new Ad unit
    Now make the settings for new ad unit as per your choices (See Below picture for example)
How to Insert Adsense Ads Below Post Title - Blogger

4. Select an ad unit of 300*250 which is best for inserting after the post titles in blogger and click the Save and Get code button which is highlighted in the screen shot.

5. You'll get a pop up in which the generated code for the ad unit will be looking like this image:

How to Insert Adsense Ads Below Post Title - Blogger

6. Just copy all the code and paste into this tool Adsense Code Converter.
The above tool actually converts the characters to be accepted by blogger core, because blogger in fact doesn't allow illegal characters like <,>,+,&& and so on, so therefore, you need to convert the code by using above tool, so it will convert all the illegal characters to the accepted ones.

Now your converted code should be looking like this: 


&lt;script type=&quot;text/javascript&quot;&gt;&lt;!--
google_ad_client = &quot;ca-pub-XXXXXXXXXXXXXX&quot;;
/* XXXXXXX */
google_ad_slot = &quot;XXXXXX&quot;;
google_ad_width = 300;
google_ad_height = 250;
//--&gt;
&lt;/script&gt;
&lt;script type=&quot;text/javascript&quot;
src=&quot;http://pagead2.googlesyndication.com/pagead/show_ads.js&quot;&gt;
&lt;/script&gt;

All the illegal characters are now removed by that tool and this code is now acceptable for blogger. Now for adding the code to blogger follow these steps (In Blogger New Edit HTML):

Blogger >> Template >> Edit HTML >> Jump to Widget >> Blog1 >> Find var='post'
When you found var='post' just click the arrow at the left side for expanding that widget
Now when the widget is expanded, search for this code: <data:post.body>
Just before <data:post.body> paste the converted code
Now your code should be looking like this:


&lt;script type=&quot;text/javascript&quot;&gt;&lt;!--
google_ad_client = &quot;ca-pub-XXXXXXXXXXXXXX&quot;;
/* XXXXXXX */
google_ad_slot = &quot;XXXXXX&quot;;
google_ad_width = 300;
google_ad_height = 250;
//--&gt;
&lt;/script&gt;
&lt;script type=&quot;text/javascript&quot;
src=&quot;http://pagead2.googlesyndication.com/pagead/show_ads.js&quot;&gt;
&lt;/script&gt;
<data:post.body/>


This is for displaying the ads below the post title, if you want to insert the ads below the post then simply paste the converted code below <data:post.body> tag. So the ads will be showing up below the post.

But in above code there is a problem, the ads will be appearing on the home page as well as on single posts, and we don't want that because we need this unit to be displayed only on single posts, not on home page. So we'll need to add an if statement which is a XML tag in blogger, so now you should be inserting the ads along with these two conditional tags like this: 


<b:if cond='data:blog.pageType == &quot;item&quot;'>
&lt;script type=&quot;text/javascript&quot;&gt;&lt;!--
google_ad_client = &quot;ca-pub-XXXXXXXXXXXXXX&quot;;
/* XXXXXXX */
google_ad_slot = &quot;XXXXXX&quot;;
google_ad_width = 300;
google_ad_height = 250;
//--&gt;
&lt;/script&gt;
&lt;script type=&quot;text/javascript&quot;
src=&quot;http://pagead2.googlesyndication.com/pagead/show_ads.js&quot;&gt;
&lt;/script&gt;
</b:if>


Now by inserting the <b:if></b:if> tags we are actually making the codes to appear only on post pages, but not on home page.

You can also use the <center></center> tags if you want the ads to be centered align. Just add the <center> tag before the ad code and </center> at the end of the ad code, so the ads will be centered align.

Conclusion
By doing this, you are not gonna violating any program policy of Google Adsense, because this is necessary for inserting the ads inside blog posts, and also you are just converting the characters to alternative characters. This doesn't mean you are changing or altering the entire ad code. So don't worry and take it easy.

I hope you'll insert Google ads easily by following all the steps mentioned in this tutorial. However, if you faced any difficulty then I'm always here to help you out, just leave your comment. Take Care!
more »

How to make Counter Strike 1.6 Server

Posted by Unknown

How to make Counter Strike 1.6 ServerIMPORTANT NOTE:
This guide is now outdated. You may not get a working server with this guide.
Search on the Internet for how to download a server.
I have not made a new guide for it, you have to search elsewhere.

Hey Gamers,
This tutorial will teach you how to create a Counter-Strike 1.6 Server.
This tutorial is a copy of the one at cstrike-planet.com
Link to orignal tutorial: http://adfoc.us/15780334957940
I have posted this tutorial here for documentation purposes and to make it easy for people to understand it.

Steps For Creating A Counter-Strike 1.6 Server:

1.
First you have to download the Steam HLDS Update Tool from: http://adfoc.us/15780334958201
Tip: If you have the Counter-Strike 1.6 Game/Client installed in your PC then you should go to that folder and copy it whole (not the cstrike folder but the folder which contains hl.exe and the cstrike folder) then go to C:\Program Files\Valve\ and paste it there, if the Valve folder dose not exist then make it. Next rename the folder you just copied to HLServer.
By doing these steps the HldsUpdateTool will only have to update the main server system files and will not download the maps, sounds and graphic files as they already exist. The total approximate download size will decrease to just 80 MB!
In this tutorial the images shown were taken when the above tip was followed. If you do not follow this tip then some items will be a little different ONLY in visuals. 2. Next after you have downloaded the Steam HLDS Update Tool you have to install it to your Server's directory that is the place where you want to install your server. It is recommended that at this moment you install it in your Window's drive that is in the same drive where windows is installed (in most cases it is the drive C:\) and after the tutorial is completed you can move this whole folder anywhere.
In this tutorial we will install it to: C:\Program Files\Valve\HLServer\
3. Now after installation of the Steam HLDS Update Tool go to the HLServer folder and Right-Click on the HldsUpdateTool.exe and select Create Shortcut: Counter Strike 1.6 Server
Next Right-Click on the Shortcut named Shortcut to HldsUpdateTool.exe which was just now created and select Properties.
Create Counter Strike 1.6 Server
We will now edit the Target field.

At the end in the Target field enter a space and then type this:
-command update -game cstrike -dir .
Note that there is a space between "dir" and the ".".
You should type like this:
-command<space>update<space>-game<space>cstrike<space>-dir<space>.
Click on OK and then double click the Shortcut to HldsUpdateTool.exe, the server files will now begin downloading:

Leave this Window alone, do not close it! The approximate size of the download is 300 MB if you did not follow the Tip mentioned above between Steps 1 and 2 and if you did then the approximate size if the download will be 80 MB.
After a while you will see a message:
HLDS Installation up to date
Now close this Window. If you do not see this message and this Window automatically closes no need to worry. It means that the server was fully downloaded.
Congratulations! You have just installed your very own Counter-Strike 1.6 Server!

Starting The Server:

There are two ways of starting the server, either by using the GUI or the Console.
Which method you choose depend on the type of server. If it will be a temporary server then use the GUI for easy setup, otherwise, stick with the console, it uses less resources. Select one of the two options:
1. Starting via GUI
Browse to C:\Program Files\Valve\HLServer\
and double click the hlds.exe icon. A menu will open and in it everything should be self explainatory:


2. Starting via Console
Browse to C:\Program Files\Valve\HLServer and right click hlds.exe then select Create Shortcut now right click that new Shortcut you just created and select Properties.

Below are a list of commands you can enter in the target field to start the server.
-console
Initializes console mode
-autoupdate
Automatically update the server when Steam updates are released
-game <game name>
The HLDS mod you want to run
+maxplayers <number of players>
Amount of players to allow
+map <map name>
The map to start the server with
-port <port number>
The port number the server should run on. Can be left out if you plan on using the default port (27015).
-ip <ipaddress>
Useful if you have multiple IPs and want to assign a particular IP to the server.

Example, you want to start the server with 12 players and the map de_aztec your target field should look like this:
"C:\Program Files\Valve\HLServer\hlds.exe" -console -game cstrike -autoupdate +maxplayers 12 +map "de_aztec"
It is better to inclose the map name in quotes ("") as long names without quotes can cause problems.
After you've entered that in the target field, click OK then double click the shortcut icon and the server should now be starting up:
make Counter Strike 1.6 Server
Do comment below, give your suggestions and share your experiences!
Regards,

Admin
more »

Itunes Download - ITunes Now

Posted by Unknown
  1. Itunes Download


    Apple - iTunes - Download iTunes Now

    www.apple.com/itunes/download/
    The world's best digital music jukebox. Download music, TV shows, movies, and more.
  2. Apple - iTunes - Affiliates - Download iTunes

    www.apple.com/itunes/affiliates/download/
    To download the item you just requested, you need to have iTunes. iTunes.
  3. iTunes - Download

    itunes.en.softonic.com/
     Rating: 3.5 - ‎2,466 votes - ‎Free - ‎Windows - ‎Multimedia
    iTunes, free downloadiTunes 11.1.2: One of the most popular media managers gets a much needed facelift and performance enhancements. iTunes is an ...
    Free Download - ‎Related - ‎iTunes Agent - ‎Mac
  4. Apple iTunes - CNET Download.com

    download.cnet.com › ... › Music Management Software
     Rating: 2.5 - ‎1,704 reviews - ‎Windows
    6 days ago - An all-new Apple iTunes? No need to tempt us: We'll bite! The look is pure Apple, but the new iTunes 11 is also lighter, sleeker, and faster than ...
  5. Download iTunes - FileHippo.com

    www.filehippo.com › Audio and Video › Players
    Free - ‎Windows - ‎Multimedia
    iTunes is a free application for Mac and PC. It plays all your digital music and video. It syncs content to your iPod, iPhone, and Apple TV. And it's an ...
  6. Apple iTunes 11.1.2 for Windows XP, 7 and 8 Download - TechSpot

    www.techspot.com › Downloads › Audio & Video
    6 days ago - Download Apple iTunes for Windows (Freeware). iTunes is a free application for Mac and PC. It plays all your digital music and video. It syncs ...
  7. Download iTunes 11.1 with iOS 7 support - iPhone Hacks

    www.iphonehacks.com/2013/09/download-itunes-11-1.html
    Sep 18, 2013 - Just ahead of the iOS 7 final release, Apple has released the final version of iTunes 11.1 to the public.
  8. iTunes (free) - Download the latest versionde iTunes in english on ...

    en.kioskea.net › Download › Audio › Podcasting/Streaming
    Apr 29, 2013 - With iTunes, it is possible to import and manage your music collection whatever their formats are: audio CD, AAC, MP3, Apple Lossless or ...
  9. Free iTunes Download Codes (Easiest Method) - YouTube

    www.youtube.com/watch?v=syg2V-PvwOk
    Sep 24, 2013 - Uploaded by James Williams
    Free iTunes Download Codes: http://bit.ly/itunes-gift-card-offer Click the link above and follow the simple steps ...
  10. Apple iTunes 11.1.2 download - V3.co.uk

    www.v3.co.uk/v3-uk/download-review/1955243/apple-itunes-1110
    6 days ago - Minor upgrade to the popular media player,Multimedia,Software ,Video,Apple,iTunes,Free,Audio.
more »